


For the rest of the tutorial we will not be going over the page structure each lesson. From here on in all the code that we will be reviewing can be tested by simply copying and pasting within your body tags.
There are several ways you can alter the text of your page. Using the same page you have created in the previous lesson, let’s make the text "Hello World” bold.
Go back to your source page. This is the notepad text file where all of your code is. If you have already closed this file there is another way to get to it.
Simply, open your mypage.html file. Your web page will open up to your default web browser. Then go to View on the main menu and then click Source. This will open up your notepad file.
Now, insert an opening bold tag, <b> before the text "Hello World” and a closing bold tag, </b> after it.
Save your page in notepad by selecting File on the main menu and the click Save.
Go back to Internet Explorer and refresh the page. There are several ways you can refresh the page. Here are some examples of how to.
- Press F5 on your keyborad
- Press the refresh button which looks like this.

- Go to View on your main menu and cick Refresh.
| Code | Result |
| <b>This text is bold.</b> | This text is bold. |
| <i>This text is italic.</i> | This text is italic. |
| <u>This text is underlined.</u> | This text is underlined |
| <big>This text is big.</big> | This text is big |
| <small>This text is small.</small> | This text is small |
| This text contains<sub>subscript.</sub> | This text contains subscript. |
| This text contains<sup>superscript.</sup> | This text contains superscript. |
| <em>This text is emphasized.</em> | This text is emphasized. |
| <strong>This text is strong.</strong> | This text is strong. |
You can also use multiple tags for the same text. For example, if you’d like to bold
and underline the same text the code to use would be:
| <b> <u> Hello World </u> </b> | Hello World |
But don’t forget! Always nest your tags. Meaning the tag that you opened last must be closed first.
Lesson 7 – Formatting Fonts
As explained earlier, some opening tags will have attributes and values. These tags help define the tags even further. For example, when it comes to the color, size and style of the font you’ll need to add attributes. Here are some examples of attributes for fonts.
| color=”blue” | color is the attribute and blue is the value |
| size=”1″ | size is the attribute and 1 is the value |
| face=”arial” | face is the attribute and arial is the value |
As shown above, the attribute must be connected to the value with an equal sign and the value must be placed in quotes.
Lets’ try to use this great tool.
Changing the font color
Say we want to change our font color to blue. First we’ll need to insert the font tags:
<body>
<font> </font>
</body>
Then we’ll need to insert the color attribute as follows:
<body>
<font color=”blue”> </font>
</body>
Then we need to put the text that we want to appear as blue in between the opening and closing font tags.
<body>
<font color=”blue”> This text is blue. </font>
</body>
Please Note: The attribute must be included within the opening tag just before the greater sign (>).
The result of the code above would be:
This text is blue.
Let’s say you want your text to be green or orange. Easy enough. All you have to do is change the "blue” in the code to "orange”, like so:
| Code | Result |
| <font color=”blue”> This text is blue. </font> | This text is blue. |
| <font color=”orange”> This text is orange. </font> | This text is orange. |
| <font color=”green”> This text is green. </font> | This text is green. |
Alternatively, you can use the color code instead of the color name. A color code is a six digit code preceded by a pound sign (#) that represents any given color. For example:
#FF0000 is the color code for red.
It is always better to use the color code since some old browsers can’t read the color name. All of the web safe color codes can be found on our color page.
Here are some examples of the color code in use:
| Code | Result |
| <font color=”#0000FF”> This text is blue. </font> | This text is blue. |
| <font color=”#FFA500″> This text is orange. </font> | This text is orange. |
| <font color=”#008000″> This text is green. </font> | This text is green. |
Changing the font size
We can also change the size of the text. In HTML the font sizes go from 1-7. Here are some examples of font sizes.
| Code | Result |
| <font size=”1″> This text is size 1. </font> | This text is size 1. |
| <font size=”2″> This text is size 2. </font> | This text is size 2. |
| <font size=”3″> This text is size 3. </font> | This text is size 3. |
| <font size=”4″> This text is size 4. </font> | This text is size 4. |
| <font size=”5″> This text is size 5. </font> | This text is size 5. |
| <font size=”6″> This text is size 6. </font> | This text is size 6. |
| <font size=”7″> This text is size 7. </font> | This text is size 7. |
Changing the font face
You can also change the face of the text. Here are some examples of safe font faces.
| Code | Result |
| <font face=”Arial”> This text is Arial. lt;/font> | This text is Arial. |
| <font face=”Arial Black”>This text is Arial Black.</font> | This text is Arial Black. |
| <font face=”Comic Sans MS”>This text is Comic Sans MS.</font> | This text is Comic Sans MS. |
| <font face=”Courier New”> This text is Courier. </font> | This text is Courier. |
| <font face=”Georgia”>This text is Georgia.</font> | This text is Georgia. |
| <font face=”Impact”> This text is Impact. </font> | This text is Impact. |
| <font face=”Times New Roman”>This text is Times New Roman.</font> | This text is Times New Roman. |
| <font face=”Trebuchet MS”>This text is Trebuchet MS.</font> | This text is Trebuchet MS. |
| <font face=”Verdana”>This text is Verdana.</font> | This text is Verdana. |
You can also include all three attributes together, as follows:
| <font color=”#0000FF” face=”Impact” size=”5″> This text is blue, Impact and size 5. </font> | This text is blue, Impact and size 5. |
Lesson 8 – Headings
Headings are a pretty useful tool to help organize your topics and they come in sizes 1-6.
Here are all of the header tags:
| Code | Result |
| <h1>This is a Heading 1</h1> | This is a Heading 1 |
| <h2>This is a Heading 2</h2> | This is a Heading 2 |
| <h2>This is a Heading 3</h3> | This is a Heading 3 |
| <h2>This is a Heading 4</h4> | This is a Heading 4 |
| <h2>This is a Heading 5</h5> | This is a Heading 5 |
| <h2>This is a Heading 6</h6> | This is a Heading 6 |
Notice how, the lower the header number the larger it will appear.
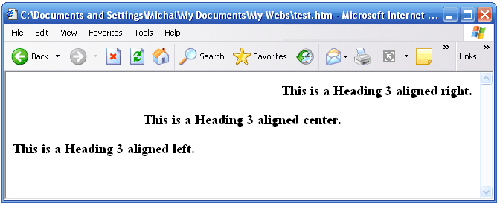
You can also align your headers right, left or center. To to this simply add the align attribute, as follows:
<h3 align=”right”>This is a Heading 3</h3>
<h3 align=”center”>This is a Heading 3</h3>
<h3 align=”left”>This is a Heading 3</h3>
Lesson 9 – HTML Entities
As mentioned in the beginning of this tutorial some tags will not have the traditional less and greater signs. Here is a list of some special characters that will need such tags.
| Tag | Description | Result |
| < | less than | < |
| > | greater than | > |
| & | ampersand | & |
| " | quotation mark | " |
| ¢ | cent | ¢ |
| £ | pound | £ |
| ¥ | yen | ¥ |
| § | section | § |
| © | copyright | © |
| ® | registered trademark | ® |
| × | multiplication | × |
| ÷ | division | ÷ |
By default it doesn’t matter how your text appears in your text editor. Internet explorer will ignore all line breaks and extra spaces. If you want linhttp://studio6000.com/html/wp-admin/edit.phpe breaks you will need to include a tag for it.
For example if you were to type the following into your notepad file.
| <body> I </body> |
The result would be:
I Love HTML.
This is because the browser will ignore any line breaks you have entered into the code. If you want a line break you will have to insert a tag for it, like so:
| <body> I<br> Love<br> HTML. </body> |
Now the result will be:
I
Love
HTML.
Let’s say you wanted an even bigger line break. Then you would use the <p> tag. This lets the browser know that a new paragraph will begin. The <p> tag is the equivalent of two <br> tags.
For example the following code:
<body> I<p> </body> |
Will appear as:
I
Love
HTML.
The <br> and <p> tag do not need closing tags.
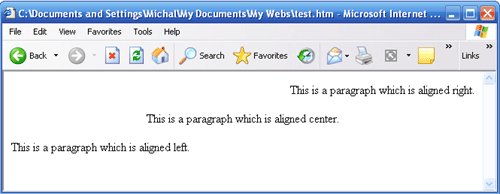
We can use the align attribute to control the alignment of paragraphs. For example:
<p align=”right”>This paragraph is aligned right. |
Browsers also ignore extra spaces. To add an extra space add the tag . This tag is an example of a tag that does not have a less than and greater sign.
The following code:
<body>This code has ten extra spaces.</body> |
Would appear as:
This code has ten extra spaces.
Notice how the result ignored any extra spaces that were typed.
To insure the spaces will appear, you must insert a tag for every space, like so:
<body> This code has ten extra spaces. </body> |
A very helpful tag is the <pre> </pre> tags. These tags will not ignore all line breaks and extra spaces from your text editor. Here’s an example:
| <pre>This text will appear like so. </pre> |
The result would be:
This text will appear
like so.